
DIY Dollhouse From Repurposed Furniture

My biggest Pinterest Challenge yet, is finally complete! I am so mad at myself right now because I took a before picture of the cabinet, and I can’t find it anywhere. It must have been erased off of the camera, before getting saved to my computer. Instead of showing you a before picture, I will have to tell you about it, and you will have to take my word for it.
My Little Girl’s 3rd birthday was this past Sunday, and I really wanted to do something special for her. I had seen and heard about people turning old tv stands, and things, into play kitchens, and I wanted to do something similar. I decided I wanted to give Little Girl a dollhouse, but didn’t want to go through the huge expense of purchasing one. Making a dollhouse isn’t exactly cheap, but I think you still save some money. If you have great thrift stores, or garage sales around, then you can save even more. The doll furniture is where I ended up spending most of my money.
I started scouring garage sales and thrift stores, for the perfect tv stand. I finally found the one I’d been looking for, at Good Will. I only paid $7 for it too! The original tv stand was a medium brown, with one shelf inside. The brackets hanging on the doors, were already installed on this tv stand, and I thought they would make perfect bedrooms.
Here is what I did, to convert this very basic TV stand, into a dollhouse, fit for a princess:

I first spray painted the tv stand, white. The next thing I did was hunt for scrapbook pages, for wallpaper. I found that using a sturdier paper, or card stock, was better for preventing bubbling. I removed the shelves from the doors, and used Loctite Stik’N Seal Indoor Adhesive, to glue the pages into place. I wanted to get all of my “wallpaper” in before placing the flooring. I used two different scrapbook pages for the front doors, and found a cute ribbon to divide the two. Just about every room has a different “wallpaper”, to give a different feel to the room.

My next hunt was for carpet and vinyl scraps, for the flooring. I went to Carpet One, and asked if they had any expired carpet samples. I got lucky with some berber. I happened to find some vinyl scraps in the garage, from our kitchen and bathroom flooring. I measured how much carpet and vinyl I wanted for each room, and used some kitchen shears, to do the cutting. I used some drops of Loctite Stik’N Seal Indoor Adhesive, to glue the flooring down. (I am loving this glue!)

Next up was to create a wall between the rooms of the main house. I had hubby cut out a piece of masonite, for me to paint and glue into place. The piece was a little weak and broke, so I had my dad cut another one out for me. I was going to have a doorway, but opted to have a solid piece in the upstairs, which made for a sturdier wall.

I didn’t want Little Girl to have to bend over to play, so my dad and I worked something out, for a means of a stand, which could double as a garage. I had an old wooden shelving unit in my son’s room, which wasn’t being used. It was one of those basic one shelves, that can be used as a shoe rack, or something of the sort. My dad turned it on it’s side, added two more shelves to close up both ends, and screwed it into the bottom of the tv stand. My mom then made an elastic dust ruffle, which can slip on and off of the dollhouse. The colors match great with her room, and the dust ruffle can be easily removed, to get washed – if needed.

Lastly, I thought the dollhouse needed some knobs, for easy opening and closing. The little pink knobs were perfect. I purchased doll furniture at Toys R Us and Amazon, but you can thrift shop and garage sale for furniture. I searched, but didn’t have a lot of luck in my small town.

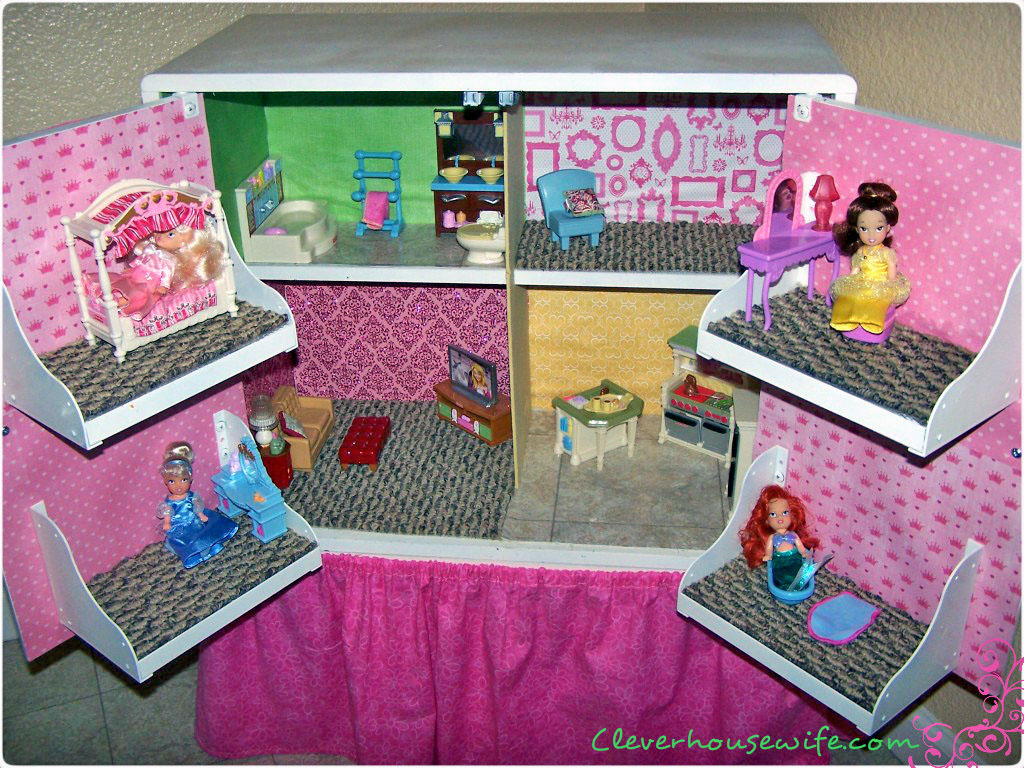
For the final touch, I had a 4 pack of princess dolls that I purchased while at Disney World last month, which I placed in the dollhouse. I covered the dollhouse with a sheet, and surprised Little Girl with it, on her birthday. She LOVES it! I think my DIY Dollhouse from repurposed furniture, was a huge success. I couldn’t be more pleased with how it turned out.

Related articles
- One of the Best Inexpensive Gifts Ever!! (cleverhousewife.com)

Sherlyn says
You are a genius. This dollhouse is fantastic. I don’t have a little girl, but I do have a son. I can’t wait until he gets older so I can make something similar as a “shop” for his tools.
Emily Lyon says
Thank you Sherlyn!! A shop for tools would be a fun project!
Heather Hazen says
Too cute!
Cathy Stesney says
This is super cute! If I was more do-it-yourself like *and more artistic/creative) I would do something like this for my daughter!
Scarlet B. says
I was looking for ideas to make a Bear Hospital for my son…this i perfect because the beds are just great!!! You are very much awesome mom!
DARLENE says
I made a barbie house from a book case but yours is really cute.
Emily Lyon says
I think that’s a great idea too!
sam says
Super cute! Not so keen on carpets, they looks too rough for the space, I found wood contact papers make for a cleaner look.
Emily Buys says
I love the idea of wood contact paper! Very clever, Sam!