
I recently gained a great appreciation for alluring photos. It has also been my goal to try to capture such photos. It is amazing how one can feel when they stop to take notice of the beauty all around. If you follow my Instagram feed, you’ll noticed I take a lot more photos of nature, architecture, landscapes and of course, food. In the process of opening my eyes to my surroundings, I have managed to capture some awesome shots with my camera, or phone. What good is a photo if it isn’t shared, or printed and put somewhere to be enjoyed? That’s where my friends at WhiteWall come in, with tips for creating a great gallery wall.
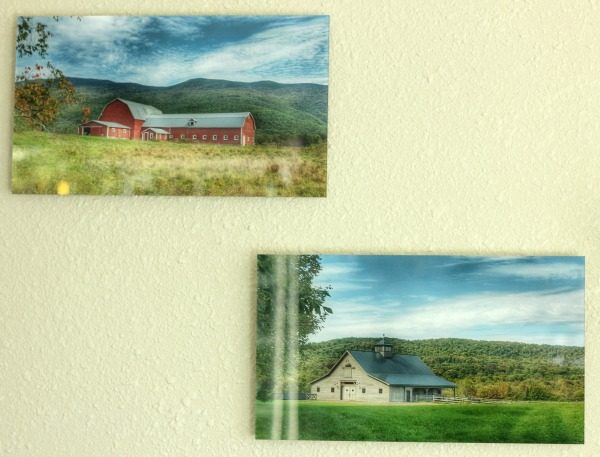
Before I get into the tips for a great gallery wall, I’d like to share my experience with using WhiteWall for printing some of my favorite travel photos. On a recent trip to Vermont, I captured a couple of country barns, using my Samsung Galaxy s6. I instantly fell in love with these photos – not only for the beauty within them, but as a remembrance of this fantastic trip I took with my husband. In working with WhiteWall to get these photos printed, they recommended getting my barn photos under acrylic glass. I was worried they would look too fancy for my home, but I was wrong. They are simply beautiful! I placed them just above my computer so I can enjoy my prints, and memories of my beloved vacation, every single day.
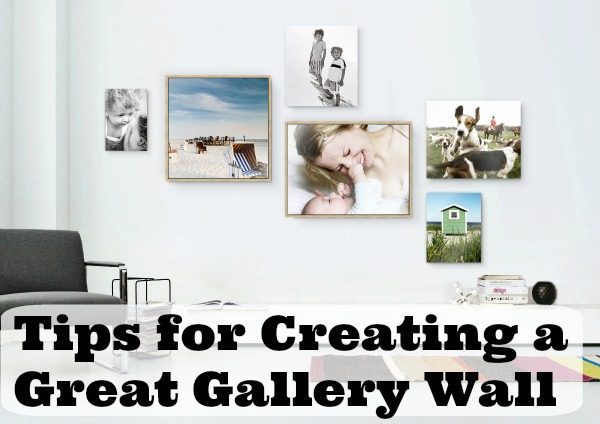
Now to get your photos on your wall, these tips for creating a great gallery wall are sure to help.
Tip 1: Think Outside the Design Box
Jan-Ole Schmidt: “By nature we think in terms of perfect symmetry. Exact sizes, even numbers of items, and identical shapes often prevent us from looking at specific walls or gallery spaces and seeing the true potential for utilizing that space. The secret is to let your imagination run wild and have some fun with the wall space you are interested in decorating with your photos.”
Tip 2: The Perfect Spot
JOS: “It’s especially important to show off your photo in the right light. Putting your picture in a dark corner won’t be as visually pleasing. Or sometimes, large windows can create unwanted glare and reflections.”
Tip 3: Have a Theme
JOS: “Like any good picture story there are certain photos that are integral to telling a complete story. It draws attention to what’s important, and your wall art will feel more expressive overall. Having a consistent theme throughout your display makes it feel harmonious. The photos you present say a lot about you. Don’t underestimate the importance of picking the right ones.”

Tip 4: Effect of Size and Shape
JOS: “Larger photos at eye-level get noticed first and smaller pictures help provide additional details about the story you want to tell with your gallery wall. Choosing the optimal ‘eye-level’ depends on whether you’ll mainly be viewing the pictures while standing or when seated. Moreover squares, rectangles, and ovals can all play nicely together and determining which photo gets certain treatment is completely up to you. The idea here is to not be afraid to mix it up.”
Tip 5: Make Connections
JOS: “It is especially atmospheric when a particular hue, its complementary color, or a certain material can be found in multiple furnishings and pictures throughout the room. Show attention to detail and let your pictures mirror the patterns and materials found in other furnishings. At WhiteWall, for example, we offer photo mattes in various colors and shades so you can always find the right color scheme for your pictures to match a room’s furnishings.”
Tip 6: Optimal Arrangement
JOS: “To get a better idea of how your gallery wall will look, we suggest you take sheets of paper and cut them into the sizes and shapes you want your photos to be on your wall. Tape sheets of paper together to create a template for the larger images and mark the face of each shape with a brief description of the photo you are thinking to use for that specific shape. Gently tack them to the wall using small pieces of putty and feel free to move them around until you like the overall pattern of shapes and sizes. As soon as your images arrived you can also get an impression of your hanging by laying the pictures out on the floor to get a feel for how they look together. You can easily move them around until you find the best arrangement for your wall. Once you like the layout, take a photo with your camera or phone and use it as a guide when it comes time to actually hang the art.”

Tip 7: The Right Print
JOS: “If you’re a newcomer, it’s easy to be overwhelmed by the large selection of materials you can print your images on — acrylic glass, aluminium, canvas, traditional wood frames, or something entirely different. Now that you have decided on the overall layout of your gallery wall using your paper templates, you should look at each photo individually and consider what materials or finish would make each photo look its best. If you want your wall art to still look amazing years down the line, it’s worth it to invest in really high-quality prints. Prints on different materials will have different auras about them, which can significantly affect the overall result. With the right choices, you can create your own personal work of art that will ideally continue to bring you joy for the rest of your life.”
Tip 8: The Right Frame
JOS: “Select a picture frame with a color or material that recurs in other furnishings. Consider how the frame becomes a part of the picture, ultimately influencing how the photo itself is perceived.”

Whether you are using a staircase, a large empty wall in your living areas, or have a small space to create something magical with your photos, these tips should help. No matter what kind of a print you decide on, I know WhiteWall will help to give you something beautiful for your walls.
Leave a Reply